Step-by-step instructions for online registration in the Class Registration system.
ID and Password
- In order to register, you must know your NetID and password to login. If you have already used the Financial Aid or Student Accounts system, you have already used your NetID and password.
- All Illinois students are assigned NetIDs and passwords when they’re admitted to the University. Your campus NetID can be found in your email address, xxxxx@illinois.edu, “xxxxx” is your NetID.
- If you forgot your password and you have set up your recovery options, you can reset your password here: https://identity.uillinois.edu
- If you did not set up your password recovery options, you will need to visit the Tech Services help desk in person. Please bring your University ID. Location and hours of the help desk can be found here: http://techservices.illinois.edu/get-help/help-desk
Log In
- Go to Student Self-Service.
- Select the Urbana-Champaign campus.
- Enter your NetID and password.
Main Menu
- After logging in, the first screen you will see is the myUIconnect page.
- Select “Student Services”
- On the Student Services Dashboard under Registration select “Class Registration.”

Class Registration Main Menu
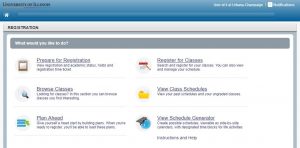
Prepare for Registration
Information at this tab indicates your readiness for registration. Here you can find when you may register, your student status and standing, any holds on your account, time ticket availability, and your current college and curriculum. If you have any questions about this information, see your advisor. When you are finished checking on your readiness to register, return to the Class Registration Main Menu.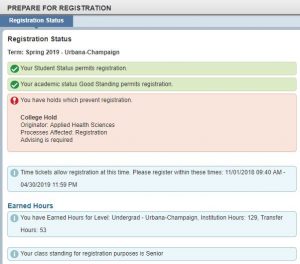
Helpful Tips:
- Check your time ticket periodically for any possible changes that would alter registration availability.
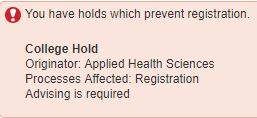
- If you have a hold, the hold originator, processes affected, and how to remove the hold are listed. For example, this particular hold affects a student’s ability to register:
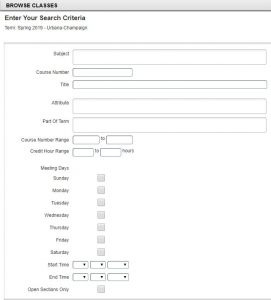
Browse Classes
- From the Class Registration Main Menu, select the Browse Classes link, choose the term you wish to view, and click the Continue button
- Select the course Subject from the available drop-down menu or you may type in the field and results will auto-populate. You may enter more than one Subject and can also search by the Course Number and/or Title. When ready, click the Search button to search for the classes using your criteria.
Helpful Tips:
- Browse Classes does not allow you to register. Registration is done through Plan Ahead or Register for Classes.
- You can use “%” as a wildcard in a search field to narrow your results. For example, “%account%” in the Title search box would result in any classes with that phrase “account” anywhere in the title name.
- Only want to view open sections for a course? You may search for only open sections by using the Advanced Search option and check the Open Sections Only box.
Plan Ahead
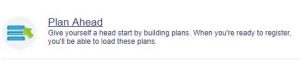
Plan Ahead is another feature that allows you to create a schedule before your time ticket is open and once it becomes available, register with just a few clicks.
If a term’s schedule is available in Course Explorer, the Plan Ahead option allows you to plan your schedule for a term before a registration time ticket is available. If a term’s schedule is not yet available, you can plan registration at the course level. Course availability for planning does not guarantee the course will be offered that term.
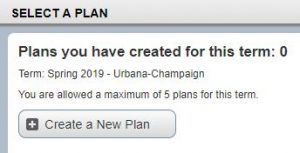
You can create a maximum of 5 plans for a term and these can be edited or deleted at any time. When your time ticket opens, you can submit the registration of all planned course sections with just a click. Registration restrictions and seat availability are checked at the time the plan is submitted.
Create a New Plan
- Select the term you want to create a plan for and click the Create a New Plan button
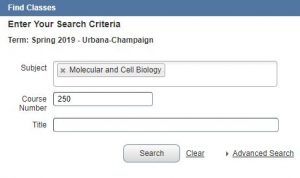
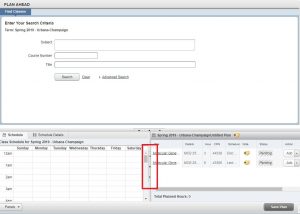
- Under the Find Classes tab, search for the courses you would like to add
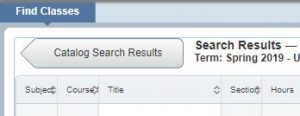
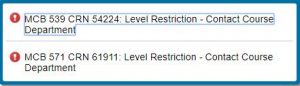
- From the search results, click View Sections to see specific sections of the course offered for the term you are planning. If there is a restriction on the section, you will see this displayed in the Status column. A restriction may not necessarily prevent you from registering for the section.

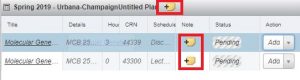
- Click the Add button next to a section to have it added in Pending status to your plan.
- To add more courses, click the Catalog Search Results button and repeat from Step #2.
Helpful Tips:
- The portal is made up of panels that can be minimized, maximized, or resized. Use either of the buttons with an arrow to move the panel in the direction of the arrow or the button with a circle to reset the panels.
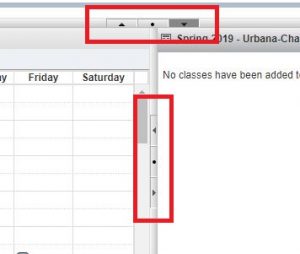
- To resize a panel, click and drag along a panel border.
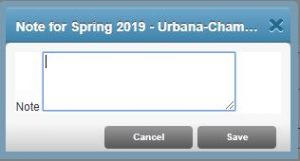
- You can make notes on a course section or specific plan by clicking on the notepad icon next to the plan name or section.
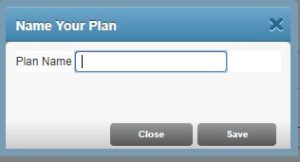
- Click Save Plan at any time to save your plan. You will be asked to Name Your Plan upon saving the first time. Each plan requires a name.
Register from a Plan
When you have an open time ticket for a term, you can register from part of or an entire plan.
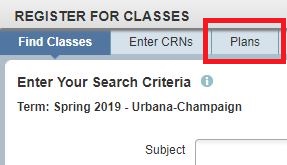
- From the Class Registration Main Menu, select the Register for Classes option.
- Select the term you would like to register for and click Continue.
- Select the Plans tab to view plans that you have created.
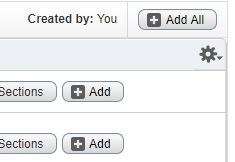
- Find the plan you want to use for registration and click the Add All button. You can also add sections of the plan individually by clicking the Add button next to a section. The sections from that plan now appear in Pending status in the Summary panel.
Helpful Tip: For course sections where seat availability may be limited, you can use the View Sections button next to a section on the plan. All sections for that course are displayed and you can add an alternate section to your plan if the one you originally selected is full.
- Click the Submit button to save your registration. At this time, seat availability and registration restrictions are checked. You will receive a message in Notifications if a seat is unavailable or you do not meet the registration requirements.

Schedule Generator
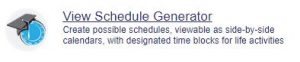
Schedule Generator is a tool that will allow you to build the optimal class schedule based on course preferences and setting aside time for breaks during the week. Create the optimal schedule and send it to Plan Ahead where you will be able to complete registration when your time ticket opens. Seat availability, registration restrictions, and holds will be checked at the time you register, not when generating a schedule. Click here to view detailed instructions for creating your optimal schedule.
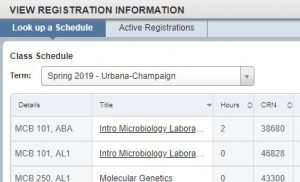
View Class Schedules

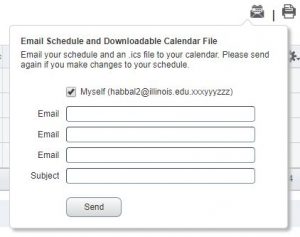
Look up past and current semester schedules here. You may view and print a single-page document of a schedule or email it to a calendar.
Register for Classes
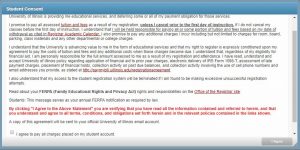
The Class Registration option requires you agree to this consent screen only once for the first time of registration. You will receive a copy of this agreement at your University of Illinois email address for documentation purposes.
Add a Class by Name
- From the Class Registration Main Menu, select Register for Classes
- You are brought to the Find Classes tab where you will enter search criteria (Subject, Course Number, and/or Title) and click the Search button
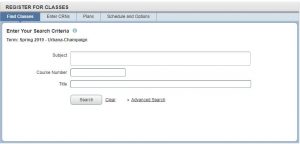
- Click the Add button for a section to have it added in Pending status to the Summary panel.
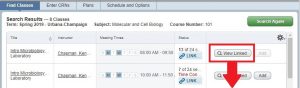
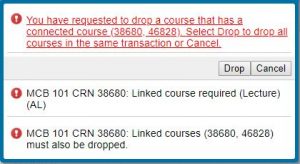
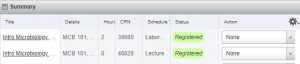
Courses that require linked sections, such as a lecture with a laboratory section, will be indicated in the Status column. If you attempt to register for a section that is linked to another section and you do not register for both, you will receive an error message. This also applies to linked sections that you attempt to drop. Any registration errors will be visible in Notifications.

- Once you have finished adding courses, click the Submit button in the lower right corner. You will now see the Status change to Registered, if no errors are present. All registration activity is in Pending status until you click Submit.
Helpful Tip: If seats are limited in a section, it is recommended that you click Submit immediately to secure your registration. Your seat is not guaranteed while the section is listed in Pending status.

Add a Class by CRN (Course Reference Number)
- From the Class Registration Main Menu, select Register for Classes
- Select the Enter CRNs tab and enter the CRN you would like to search for. You may add more than one CRN at once by using the Add Another CRN link.
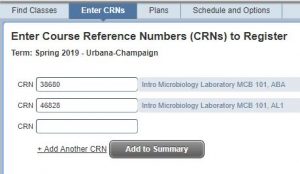
- Click the Add to Summary button to have the section(s) added in Pending status to the Summary panel. Any registration errors will be visible in Notifications.
- Once you have finished adding courses, click the Submit button in the lower right corner. You will now see the Status change to Registered, if no errors are present. All registration activity is in Pending status until you click Submit.
Drop a Class
- Next to each section in the Summary panel is a drop-down menu. Select Web Drop Course from the drop-down next to the class you wish to drop.
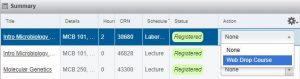
- Click the Submit button to save any changes.
The option to drop a class is limited. You may drop courses only until deadlines found in the applicable semester’s Academic Calendar. You may drop your last/only course through the Class Registration portal at certain times of the semester.
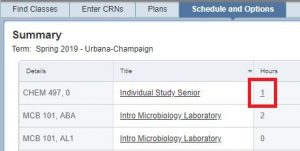
Variable Credit Hour Classes
Variable credit hours can only be updated on the Schedule and Options tab of the Register for Classes section of Class Registration. The Hours value is underlined if it is a variable credit hour section. Click the number listed to adjust the credit hour value.
Helpful Tip: Some independent studies and other variable credit hour courses may not be accessible in the course search feature. In order to register for these, you will need to use the CRN provided by the instructor or department office of the course.
Frequently Asked Questions
- I have a hold and am unable to register. How do I remove the hold?
- You may view your hold type, who placed the hold, and how to contact them about removing the hold in Prepare for Registration.
- Where can I view information regarding my time ticket for registration?
- You may view your time ticket for a term through Prepare for Registration. The earliest time that you may register will be displayed as the registration start date and time. It is recommended that you check back periodically to view any possible changes made to your time ticket.
- How do I search for classes during a term?
- Select Browse Classes from the Class Registration Main Menu, enter your search criteria into the fields provided, and click Search. If you would like to narrow search results to view only open sections, use the Advanced Search option and check the box marked Open Sections Only.
- How do I view my class schedule from a previous term?
- Select View Class Schedules from the Class Registration Main Menu. On the next screen, use the Term drop-down menu to select the schedule of any term you have previously registered for.
- I know what courses I want to register for, now what?
- You may register through the Class Registration portal in two ways: search through the current course schedule or by using a registration plan you have created in Plan Ahead.
- How do I register for courses using a registration plan I created in Plan Ahead?
- Select Register for Classes from the Class Registration Main Menu and select the term you would like to register for. Under the Plans tab, find the plan you would like to register from and Click the Add All button to register for the entire plan. If you would like to register for part of a plan, click the Add button next to each desired section. Click Submit to save changes.
- How do I change the hours on a variable credit hour class?
- Select Register for Classes from the Class Registration Main Menu. From the Schedule and Options tab, a course section that will allow credit hour changes will have the hours number underlined. Click the Hours number and edit the hours of the section.
- How do I drop a course section in the Class Registration portal?
- Select Register for Classes from the Class Registration Main Menu. Select the term you wish to drop a course from and go to the Summary panel at the bottom. Next to the section you wish to drop, select Web-Drop from the drop-down menu. Click the Submit button to save changes made.
- How do I create a registration plan for a future term?
- Click here to be taken to the instructions for creating a registration plan for future terms.
- Can I see what my tuition and fees will look like after I make changes to registration?
- In the Summary panel of the Register for Classes section is a Tuition and Fees link. This total will represent only tuition and fees. A detailed view of your account is available via Self-Service.